Prerequisites
XrmToolBox requires that Microsoft .Net Framework 4.6.2 (or above) is installed on your computer. Please follow this link to install it.
Download
You can download the latest version from the home page.
Do not forget! Once you have downloaded XrmToolBox.zip, you may need to unblock it!
To verify whether you need to unblock the XrmToolBox files, you will need to check the properties of your downloaded file. Right click on the zip file, choose Properties, and view the General tab on the Properties dialog. If the file is blocked, you will see a button or checkbox to unlock the file. For Example:
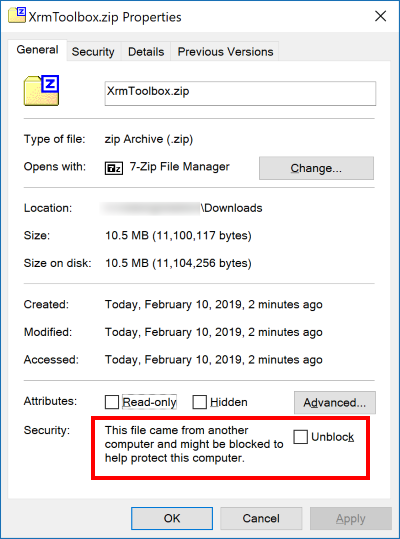
Check the Unblock option and choose Apply. Now you can extract the zip file safely
Change XrmToolBox storage location
By default, XrmToolBox is using your roaming profile to store files like tools, connections, logs, settings, etc. These files are available in the folder C:\users\your_login\appData\roaming\MscrmTools\XrmToolBox, or using the environment variable, %APPDATA%\MscrmTools\XrmToolBox. When you first launch XrmToolBox, these folders will be created if they do not already exist.
You can change this location for XrmToolBox. For example, you may have a group policy that prevents access to this folder for some applications, or you want to run multiple independent XrmToolBox instances.
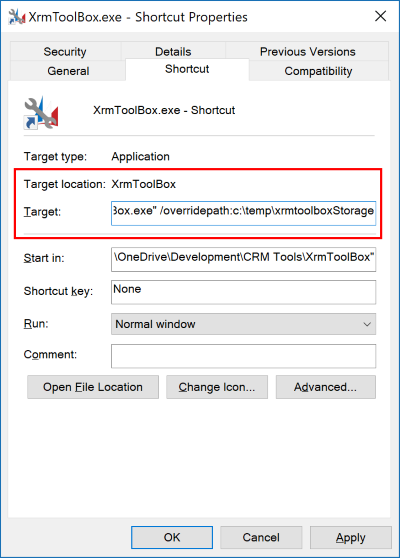
To change this location when you launch XrmToolBox, you will need to pass a command line argument:/overridepath:custom_location This command line parameter instructs the XrmToolBox to bypass the roaming profile and use the path specified for the tools, connections, logs, and settings. The simplest method for passing this command line argument is to create a shortcut to the XrmToolBox executable with the additional command line parameter.
To create the shortcut, right click on the downloaded XrmToolBox.exe and choose Create Shortcut. Right click the new shortcut and open the Properties. In the Shortcut tab, add the /overridepath:custom_location to the Target property, following the full path to the XrmToolBox.exe.
For example, using c:\temp\xrmtoolboxStorage as our override path location:
To store XrmToolBox files in the same folder than the executable, use /overridepath:.

