The easiest way to create a tool for XrmToolBox is to use the XrmToolBox plugin Template available on Visual Studio Gallery. You can either download and install the VSIX from Visual Studio Gallery or install the extension from your favorite IDE for .Net, Microsoft Visual Studio 2017. See this page for more information
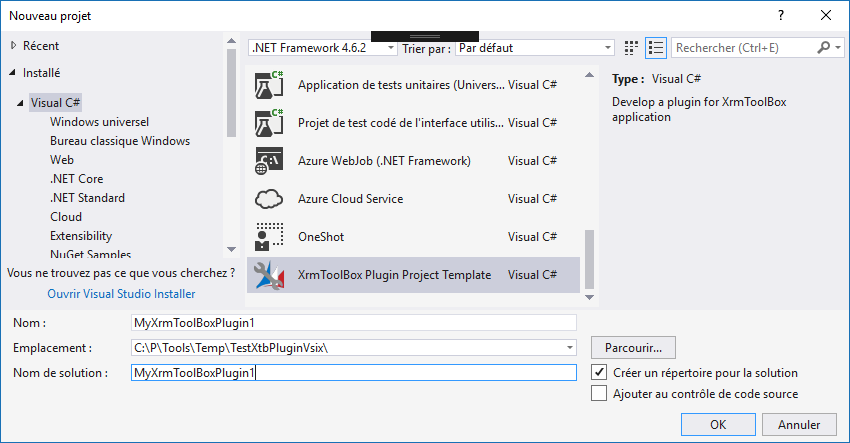
Open Microsoft Visual Studio 2017/2019/2022
Click on File > New > Project
In Visual C# category, select XrmToolBox Plugin Project Template, adapt name and path for the project and click on OK
Voila! the structure of your tool is ready. We can now focus on customizing the tool and implementing the code logic.
In XrmToolBox, tools are displayed in a list on the main application form. Your tool should have its own graphic charter so it can be visible among other tools.
To customize your tool graphic charter, open the file MyPlugin.cs
Update class attribute properties to define images and colors
using System.ComponentModel.Composition;
using XrmToolBox.Extensibility;
using XrmToolBox.Extensibility.Interfaces;

namespace MyXrmToolBoxPlugin1
{
    // Do not forget to update version number and author (company attribute) in AssemblyInfo.cs class
    // To generate Base64 string for Images below, you can use https://www.base64-image.de/
    [Export(typeof(IXrmToolBoxPlugin)),
        ExportMetadata("Name", "My First Plugin"),
        ExportMetadata("Description", "This is a description for my first plugin"),
        // Please specify the base64 content of a 32x32 pixels image
        ExportMetadata("SmallImageBase64", null),
        // Please specify the base64 content of a 80x80 pixels image
        ExportMetadata("BigImageBase64", null),
        ExportMetadata("BackgroundColor", "Lavender"),
        ExportMetadata("PrimaryFontColor", "Black"),
        ExportMetadata("SecondaryFontColor", "Gray")]
    public class MyPlugin : PluginBase
    {
        public override IXrmToolBoxPluginControl GetControl()
        {
            return new MyPluginControl();
        }
    }
}
- Name : the name displayed in the tools list
- Description : A short description of your plugin purpose. Displayed in the tools list
- SmallImageBase64 : A base64 string that represents a 32 pixels wide image
- BigImageBase64 : A base64 string that represents a 80 pixels wide image
- BackgroundColor : Background color of the tools item in the tools list
- PrimaryFontColor : Font color for Name, Description, Version (and Author in Large icons display mode)
- SecondaryFontColor : Font color for Author in Small icons display mode
To encode image to base64, you can use online services like https://www.base64encode.org/
Do not forget to customize also file AssemblyInfo.cs to define author and version of the tool
using System.Reflection;
using System.Runtime.InteropServices;

[assembly: AssemblyTitle("MyXrmToolBoxPlugin11")]
[assembly: AssemblyDescription("")]
[assembly: AssemblyConfiguration("")]
[assembly: AssemblyCompany("Plugin Author")]
[assembly: AssemblyProduct("MyXrmToolBoxPlugin11")]
[assembly: AssemblyCopyright("Copyright ©  2017")]
[assembly: AssemblyTrademark("")]
[assembly: AssemblyCulture("")]
[assembly: ComVisible(false)]
[assembly: Guid("41664821-b56a-4fe9-93f5-eeada2fa8de7")]
[assembly: AssemblyVersion("1.0.0.0")]
[assembly: AssemblyFileVersion("1.0.0.0")]
In addition, you can add Icons to the tool control itself. If you open the main control in Designer mode, you can alter the properties for both PluginIcon and TrayIcon.
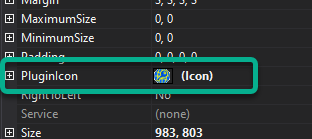
Plugin Icon is displayed when your tool is displayed in it's own window.
Tab Icon is displayed when a user drops down the list of tabs they have available
Your code logic is embedded in file MyPluginControl.cs. It's a UserControl that comes with a menu bar and some other features you can explore on this page.
DO NOT USE Early Bound Entities in your tool code logic. That will make a conflict with other tools and make XrmToolBox unable to connect to any organization. It will also lead to bad reputation for your tool!
Sometimes, you may need to use third party libraries to provide features in your tool. There is not restriction to do so, but you need to merge your tool and its dependencies in one single file or use the AssemblyResolveEventHandler from the template project to load assemblies from dlls added to the nuget file in its own folder named with the same name as the plugin. This is to ensure that there won't be any version conflict between tools using same third party Library but with different versions.
You can use ILMerge tool to merge all assemblies into a single one.
Merging is not necessary for assemblies already contained in XrmToolBox installation folder (like Dynamics 365 CE Sdk assemblies, or DockPanelSuite)

